Homemade Reese’s Cups with Chocolate Shell
Highlighted under: Cozy Recipes
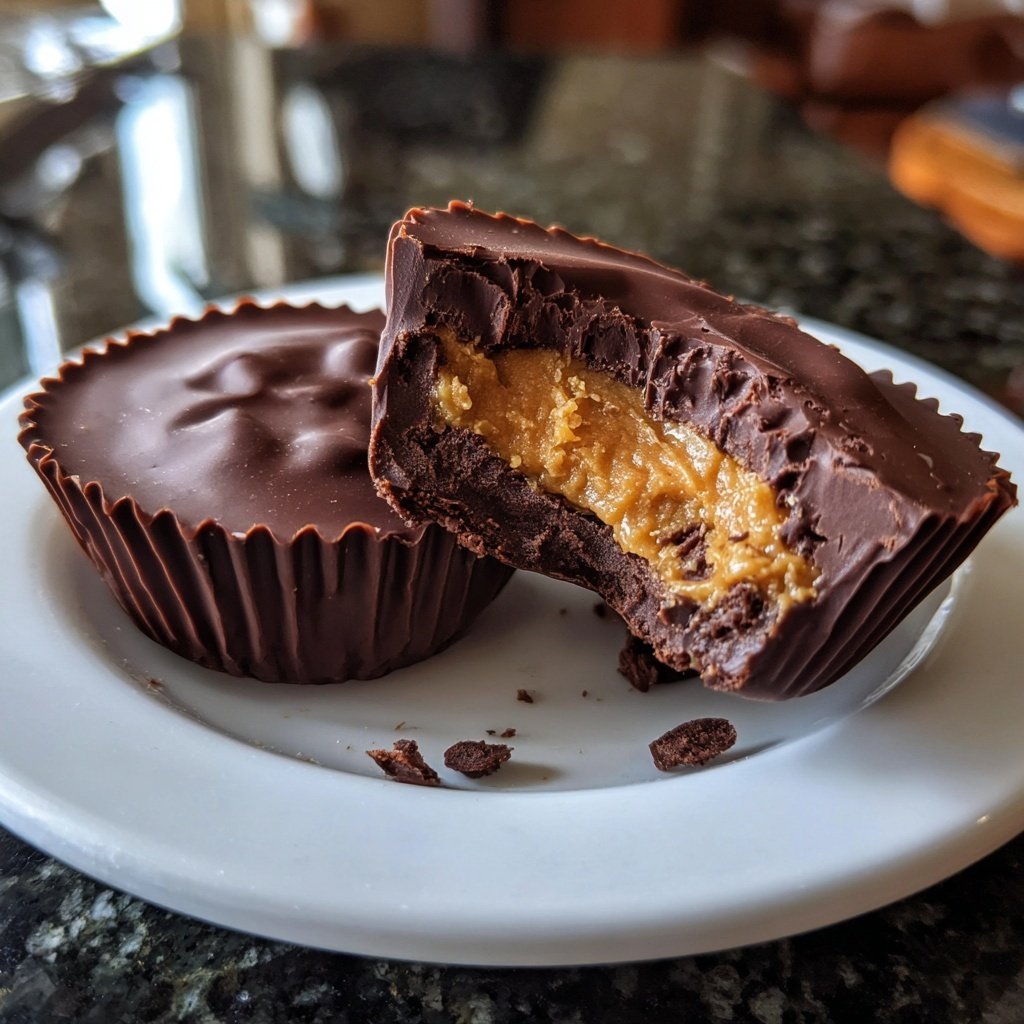
I am excited to share my take on crafting Homemade Reese’s Cups with a delightful chocolate shell. There’s something incredibly satisfying about creating a candy that rivals the store-bought version, and I love that I can control the flavors and quality of ingredients. With just a few simple steps, you’ll treat yourself to a sweet indulgence that pairs nutty, creamy peanut butter with rich, luscious chocolate. This recipe is perfect for satisfying your cravings or impressing friends during gatherings!

While experimenting in my kitchen, I discovered how simple it is to recreate that iconic Reese’s taste. The secret lies in balancing the sweetness of the chocolate with the salty richness of the peanut butter. I learned that using high-quality chocolate makes a significant difference, enhancing both texture and flavor as it melts in your mouth.
One crucial tip I picked up is to chill the peanut butter mixture before molding it in chocolate. This helps the filling hold its shape better and prevents the layers from blending together. I promise once you make these, store-bought versions will never be the same!
Why You Will Love This Recipe
- Rich chocolate flavor paired with fresh peanut butter
- Creamy texture that melts in your mouth
- Perfect for celebrations or as a sweet indulgence
Mastering the Chocolate Layer
Achieving the perfect chocolate layer is essential for that signature Reese’s Cups texture. When melting the chocolate chips with coconut oil, be sure to stir often and use low heat to avoid burning. If you notice small lumps while melting, remove the bowl from the microwave and stir vigorously. You want the chocolate to be glossy and completely smooth; take care not to overheat it, as chocolate can seize and become unusable.
Using coconut oil not only helps achieve a smooth melt but also adds a slight sheen to the chocolate when it sets. If you don't have coconut oil on hand, vegetable oil or shortening can be used as substitutes, but they may not yield the same level of richness or flavor. Ensure the melted chocolate is slightly cooler but still pourable when assembling, as hot chocolate can affect the firmness of the peanut butter layer.
Perfecting the Peanut Butter Filling
The balance of flavors in your peanut butter filling is key to making these cups enjoyable. Using creamy peanut butter is recommended as it blends smoothly with powdered sugar and vanilla extract, resulting in a luscious filling that easily molds. If you prefer a chunkier texture, consider using crunchy peanut butter mixed in a 50/50 ratio with creamy peanut butter for added texture.
Refrigerating the mixture before mold formation is not just a step—it's crucial for achieving that satisfying bite. Allowing it to chill for about 10 minutes makes it firm, which in turn allows for easy handling without sticking to your hands. If the mixture feels too soft after chilling, adding a tablespoon more of powdered sugar can help stiffen it without compromising the flavor.
Ingredients
Gather your ingredients to create these delicious homemade treats.
Ingredients for Homemade Reese's Cups
- 1 cup creamy peanut butter
- 1/2 cup powdered sugar
- 1/2 teaspoon vanilla extract
- 1 1/2 cups milk chocolate chips
- 1 tablespoon coconut oil
- Sea salt (optional)
Make sure all your ingredients are ready before starting the process.
Instructions
Follow these steps to make your own Reese’s Cups!
Prepare the Peanut Butter Filling
In a mixing bowl, combine the creamy peanut butter, powdered sugar, and vanilla extract. Mix until smooth and fully incorporated. Refrigerate the mixture for about 10 minutes to firm it up, making it easier to mold.
Melt the Chocolate
In a heatproof bowl, melt the milk chocolate chips and coconut oil together. You can do this in the microwave in 30-second intervals, stirring between each, until completely smooth.
Assemble the Cups
Line a muffin tin with paper liners. Pour a layer of melted chocolate into each liner, just enough to cover the bottom. Use a spoon to spread the chocolate evenly and up the sides. Freeze for about 10 minutes to set.
Add the Peanut Butter Layer
Once the chocolate is set, scoop out small amounts of the chilled peanut butter mixture and place it on top of the chocolate layer in each cup. Press it down gently.
Finish with Chocolate
Pour more melted chocolate over the peanut butter layer to cover it completely. Optionally, sprinkle with a little sea salt for an extra touch. Freeze again for about 15 minutes to let them harden.
Enjoy
Once set, remove the cups from the muffin tin and peel off the liners. Enjoy your homemade treats! These can be stored in an airtight container in the refrigerator for up to a week.
Now that you’ve created your delicious Reese’s Cups, enjoy them as a delightful dessert!
Pro Tips
- For a twist, you can substitute the creamy peanut butter with crunchy peanut butter for added texture. Additionally, experimenting with dark chocolate instead of milk chocolate can enhance the flavor profile and richness of the cups.
Tips for Making Ahead
These Homemade Reese’s Cups can be made ahead of time, making them a great treat to have on hand for unexpected visitors or special occasions. Once the cups are fully set, store them in an airtight container in the refrigerator. They remain fresh for up to a week, although I recommend enjoying them within the first few days for the best texture and flavor.
If you want to prepare them well in advance, consider freezing them. Place the cups in a single layer on a baking sheet until fully frozen, then transfer them to a freezer-safe container or bag, layered with parchment paper. They can last for up to three months in the freezer. When you're ready to enjoy, simply let them sit at room temperature for about 15-20 minutes before indulging.
Scaling Up the Recipe
If you're planning a gathering or party, scaling up this recipe is a breeze! Simply double or triple the ingredient amounts, keeping the proportions the same. Using larger muffin tins or mini muffin tins can yield various sizes of cups, catering to different preferences. Just be sure to extend freezing times as needed, especially if you create larger cups.
To maintain consistency, ensure you have enough space in your freezer to accommodate multiple trays unless you’re using a standard muffin tin. For quicker chocolate setting, placing them towards the back of the freezer, where it's typically colder, can expedite the process. Just keep an eye on them, as the chocolate can sometimes become too hard if left too long.
Questions About Recipes
→ Can I use a different type of nut butter?
Yes, almond butter or cashew butter work well as substitutes for peanut butter.
→ How should I store these Reese's Cups?
Keep them in an airtight container in the refrigerator for up to a week, or freeze them for longer storage.
→ Can I use dairy-free chocolate?
Absolutely! Use dairy-free chocolate chips to make this recipe suitable for a vegan diet.
→ What can I do if my chocolate hardens too quickly?
If the chocolate is hardening before you can work with it, you can gently reheat it in the microwave or over a double boiler to bring it back to a pourable consistency.
Homemade Reese’s Cups with Chocolate Shell
What You'll Need
Ingredients for Homemade Reese's Cups
- 1 cup creamy peanut butter
- 1/2 cup powdered sugar
- 1/2 teaspoon vanilla extract
- 1 1/2 cups milk chocolate chips
- 1 tablespoon coconut oil
- Sea salt (optional)
How-To Steps
In a mixing bowl, combine the creamy peanut butter, powdered sugar, and vanilla extract. Mix until smooth and fully incorporated. Refrigerate the mixture for about 10 minutes to firm it up, making it easier to mold.
In a heatproof bowl, melt the milk chocolate chips and coconut oil together. You can do this in the microwave in 30-second intervals, stirring between each, until completely smooth.
Line a muffin tin with paper liners. Pour a layer of melted chocolate into each liner, just enough to cover the bottom. Use a spoon to spread the chocolate evenly and up the sides. Freeze for about 10 minutes to set.
Once the chocolate is set, scoop out small amounts of the chilled peanut butter mixture and place it on top of the chocolate layer in each cup. Press it down gently.
Pour more melted chocolate over the peanut butter layer to cover it completely. Optionally, sprinkle with a little sea salt for an extra touch. Freeze again for about 15 minutes to let them harden.
Once set, remove the cups from the muffin tin and peel off the liners. Enjoy your homemade treats! These can be stored in an airtight container in the refrigerator for up to a week.
Extra Tips
- For a twist, you can substitute the creamy peanut butter with crunchy peanut butter for added texture. Additionally, experimenting with dark chocolate instead of milk chocolate can enhance the flavor profile and richness of the cups.
Nutritional Breakdown (Per Serving)
- Calories: 380 kcal
- Total Fat: 26g
- Saturated Fat: 15g
- Cholesterol: 195mg
- Sodium: 85mg
- Total Carbohydrates: 32g
- Dietary Fiber: 3g
- Sugars: 24g
- Protein: 6g